
An over-under shot of a diver waiting to be picked up at the end of a dive.
I recently completed a short shoot requiring over-under shots at sea; shots of a boat passing by and of a girl who had ‘fallen’ in to the sea. This was UK waters in late September, so conditions were – shall we say – not mirror smooth and crystal clear. If fact we ended up shooting about an hour and a half before sunset with the water darkening and a noticeable sou’westerly breeze creating a bit of a swell; so on the positive side the look was realistic. The shots had been planned for a Sony Alexa, but housing availability and cost considerations pushed the shoot to a DSLR; a Canon 5D MkII to be precise. At first consideration shooting video on a DSLR may seem a big step down from the 2K Alexa, but that’s not necessarily so. The shoot brought a number of these points to mind, so I thought I’d write a short blog on the pros and cons of dedicated high-end video cameras versus DSLRs for shooting over-under or surface shots in open sea. I’m not going to consider or compare camera image quality here; there are plenty of websites reviewing and out there doing just that. Instead I’m going to look purely at usability in this rather problematic situation. Producing good images is not simply a question of image resolution; factors such camera steadiness, ability to focus and frame accurately and freedom from water splash droplets need to be taken in to account also. I’ve randomly selected some well known manufacturers to as examples. This is not to imply the are particularly better or worse than others, simply that they are brands many will be familiar with and the data for them is readily available (and sometimes because I have used them and so have experience and images). Equally, any implied criticism is merely to point out that in this very specific type of shot certain types of equipment have inherent problems. In general, for underwater shoots (which is what they are designed for) they perform excellently.
Weight
A key consideration is the overall weight of the rig. Now of course well designed housing-camera combinations are near neutral buoyancy below the surface as the air spaces inside the housing providing positive buoyancy and so compensating for the weight of the metal, glass and perspex of the housing and the camera itself. Close to the surface a large housing with plenty of mass is also a distinct advantage. Swell and surface chop will buffet both cameraman and camera, tending to make the image jump about. A large system with plenty of mass will resist such buffeting and moves more slowly than a little lightweight system, in much the same way as a small rowing boat is tossed about by wave action that has no effect at all on a naval destroyer.

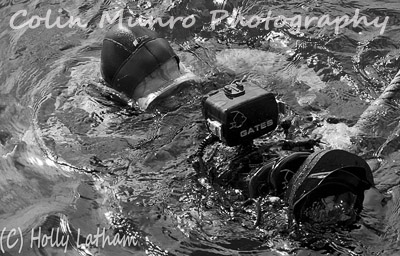
Holding a full size video system partially out of the water requires the strength of Arnie Swarzenegger, even with a trailing line to hang on to. Picture by Holly Latham.
On the surface however, other factors come in to play. That positive buoyancy that balances the weight of the system disappears, and the downward force of the weight of the proportion of the camera and housing above the surface is counteracted only by the upward force applied on the grip handles by the cameraman’s arms. That is damn hard work! As an example, a Gates housing for the Red Epic or Scarlet, in air, weighs in at about 43lbs (19.5kg) including camera. That’s roughly the weigh of a six year old child. It is true that not all of that weight will be felt as not all of the housing will be above the surface; but even if it is only 20lbs for those half and half shots you are going to need pretty impressive biceps and shoulder muscles to hold it up and hold it steady whilst getting that 3rd take of that key shot. You are also going to be finning like hell to counteract the toppling forward effect of the unbalanced weight of the housing held in front of you. Comparing this with a suitable DSLR for video, a 5D MkII in an Aquatica housing (again, given as a representative example) weighs in at around 9lbs (4kg). This is still not much fun in a choppy sea but you don’t have to be built like Arnie to be capable of doing it.
Leverage
Essentially the weight distribution combined with the overall length of the rig. Again, a DSLR wins hands down in the category. A Gates housing for the Sony EX1 is around 17 inches (44cm) long; an Amphibico housing for the Sony EX3 squeezes in at a tad over 20 inches (52cm). For over-under shots one will almost certainly need to be working with a wide angle lens and a big dome port (if you don’t understand why, read the last paragraph). This can mean having something like the exceedingly beautiful and optically wonderful, but extraordinarily heavy Fathom superwide port fitted to the far end of your housing. This will produce stunning images but cause vein-popping strain on your upper body as you attempt to lever this half out of the water. Big glass ports on DSLRs are also heavy (e.g. the fantastic Zen DP-230 9 inch superdome, weighs in at 3.9lbs, 1.8kg) but due to the much shorter length of DSLR housings they are mounted only a couple of inches in front of the grip handles. There is still a forward tilting effect, but it is much less pronounced.

As can be seen in this pic of leak testing a Hugyfot, the dome port is only fractionally in front of the grips handles.
A final consideration is focussing and viewing. Most housings for professional video systems do allow viewing of the camera’s viewfinder, but this is generally small and tricky to use through a housing even in easy conditions. So instead most come equipped with a larger external monitor that can be mounted on top of the housing. This is perfect for underwater, but at the air-water interface simply adds additional weight above the water’s surface, pushing the camera further down. External monitors are also available for DSLR housings, and again they are extremely useful beneath the surface but not at the surface. DSLRs do have the advantage of having a large LCD screen that is much easier to view at the surface of a choppy sea; many housings will also take a 45 degree enlarged viewfinder that can make focussing and framing through the viewfinder a much more practical proposition when floating on the surface.
Why do we need to use wide-angle lenses and large dome ports?
This is a brief summary of quite a complicated subject. We need to use large dome ports when taking over-under shots for two reasons. The main reason is because light travels at a different speed through air than water. If flat ports are used with wide angle lenses then considerable bending occurs to light rays passing through the port other than those passing through perdicular, significantly distorting all except the central part of the image. However, this change in wave velocity of light passing through the dome (effectively a curved water-air interface) causes the dome to act as a powerful diverging lens below the water surface making objects at infinity appear to be at a distance of slightly less than 4 x dome radius. This is known as the virtual image. Thus using a small dome port, with a small radius, will bring the virtual image very close to the lens entrance pupil. For example, a 4 inch dome port will result in a virtual image approximately 5.5 inches in front of the port. Above the surface, with air on either side of the dome, this effect does not happen and the lens must focus on the actual image to produce sharp images. Consequently a lens with a large depth of field (DoF), i.e. a wide-angle lens, is required. However 5.5 inches to infinity is too great a DoF for almost any lens, thus a larger dome is required, moving the virtual image further away from the front of the dome and so decreasing the required DoF for both underwater and above surface images to be in focus simultaneously. An 8 inch diameter dome is generally considered the minimum necessary to allow simultaneous focussing above and below the surface (a more detailed technical explanation, with calculations and downloadable formulae has been produced by Dave Knight of Cameras Underwater. This can be read here. The example figures I give here also came from Dave’s page). The second consideration is that, if working in a pool with a mirror calm surface, then we can precisely line up the water surface with the middle of the lens even on a tiny dome or flat port. It’s not like that in the sea though; if you are lucky you’ll be working with just a few ripples or maybe a lazy swell passing through, if not you may have 18inch waves slopping through (if you have more than this, give up and go home). A bigger dome gives you more surface area to play with when lining up the camera. It also means that small waves or splashes are less likely to cover the upper half of the dome, leaves droplets visible on the surface. Whilst on the point of droplets and splashes, the biggest curse of trying to shoot half in-half out, although heavier and more expensive, glass domes do have the advantage of shedding water more easily that their acrylic counterparts.