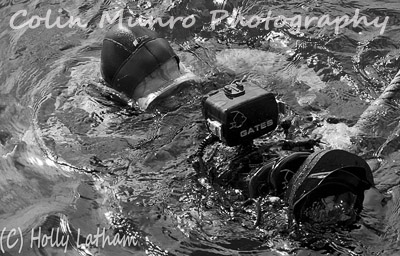
Why add a copyright logo?
Posting images online is a great way to get your images seen but (there’s always a but) it does leave you open to image theft and unauthorised use. While there are various tricks around – disabling right-clicking, placing images in Flash displays etc., if someone knows what they are doing and are prepared to put a tiny bit of effort ito it they can lift your image. For a photographer it is not always desirable anyway to prevent people doing this; potential buyers may want to store a copy of some images to browse later or as a reminder. In this way photographs can be like business cards, and we don’t ask for those back as we leave the conference hall do we? But like any form of advertising we want the (potential) client to remember where the image came and, most importantly, who it belongs to. Now this can (and should) be done adding to the image metadata, however this is not immediately obvious and must be actively searched for (it can also be stripped out, unintentionally or otherwise, by some programmes). A simply logo has the advantage that it is immediately obvious so is like branding – the more your image is shared around the more people associate it with your name and or website.
What should it include?
There is more than one way to do so, this just happens to be my preferred way. Thekey information I want included are 1. my name; 2. clear identification of my copyright 3. a quickway the viewer can locate me, and 4. a quick way for the viewer to find more of my images. This obviously has to be done as succinctly as possible, no-one wants to look at an image covered in screeds of text. 1 and 2 are easy to combine as (C) Colin Munro Photography; it helps in my case that my business name includes my own name so there is no confusion as to exactly where the copyright lies and no need to repeat both seperately. With 3 and 4 I could include both my email and website, but as my email is very clearly displayed on my website I chose to keep things compact and just go with my website.
Ok, so to creating a logo.
These instructions apply to Photoshop, however the workflow is similar in other editing packages. You have you final image, resized for the web and suitably sharpened. Decide on the colour you want the text to be (generally white or black) and set this as the foreground colour using the set foreground and background colours icon in the toolbar. Click on the Horizontal Type Tool. The icon is a capital T, located in the toolbar. This will change the horizontal toolbar at the top of the window to change and display font, font size, formattint etc. Select the approximate font size you’d like (you may have to experiment here). Clicking on the type tool will also create a new layer (visible in the layers sidebar) which will be the active layer in which text will be created. Then simply position the cursor approximately where you’d like the text to start and begin typing. Once your text is all typed out it may not be ideally positioned, or it may appear slightly too large or too small. To rectify this click on the ‘move’ tool (the cross with arrowheads at all four compass points). This will make the text a selection which can be be moved, shrunk or expanded using the cursor. However if you do re-size you will need to apply the transformation (by clicking again on the move tool and then selecting ‘apply transformation’ in the pop-up box) before you can complete other tasks. Sometimes you may not want your copyright logo too prominent; one way to change this is to reduce the opacity, making is partially transparent. This can be done using the opacity slider in the layers dialogue sidebar. Once your text is suitably sized, positioned and has the right level of opacity, your final task is to flatten the image, merging your text with the underlying picture. Simply click on the layers tab; right at the bottom of the drop-down menu you will see ‘flatten image’. Select this, save and your image is ready to upload. Of course we can automate this process by creating batch processing actions in Photoshop, but that’s for another blog. For those based in Exeter, Devon, I am currently running Digital Photography classes later this month and will also be running Photoshop classes subject to demand.

