
Photoshop Elements: adding text and changing transparency in Photoshop Elements 11.

Working with Photoshop Elements 11.

Photoshop Elements is a hugely powerful tool for the price and one of the nice features of the lastest version, Photoshop Elements 11 making many image editing tasks very easy by introducing the ‘guided’ mode.  The ‘expert’ mode provides the greatest number of features and options, and most closely resembles the full professional version of Photoshop.  One of the most useful features only available in ‘expert’ mode is the layers feature (note, the layers menu is still visible in the top menu bar in both ‘quick’ and ‘guided’ modes, but all options in the drop-down menu are greyed out).

In this blog I’m going to talk about using the Horizontal Type Tool (symbol ‘T’) to create text layer on your image, and then how to modify the text appearance, making it semi-transparent, by changing the layer opacity.

Step 1.  Once you have opened up Photoshop Elements, select Photo Editor mode, then ensure you are in ‘expert’ mode.  Once this has loaded then open the image you wish to add text to.  As my example I have chosen an image of a black swan guarding her nest as the River Exe floods.  I am going to add copyright text to this image, something I often do to identify my images prior to placing them online.

Step 2.  Once your image has loaded, click on the Horizontal Type Tool ‘T’ (highlighted in grey on the lower LHS of the image below).

Adding text to an image in Photoshop elements 11, step one, select the Horizontal Type Tool (T).

Image 1. Adding text to an image in Photoshop elements 11, step one, select the Horizontal Type Tool (T).

You’ll notice that a sub-menu pops up beneath the image. Heer you will find options to change the default font, font size, font style, colour, leading and anti-aliasing. Leading (pronounced ‘ledding’) refers to the spacing between lines in a paragraph, should you be writing more than one line of text. Anti-aliasing (very briefly) smooths jagged edges that can occur around the edges of text; if you’re not familiar with anti-aliasing leave the box checked.

Sub-menu where text font and styles can be edited.

Image 2. Sub-menu where text font and styles can be edited.

Step 3.

Once you have select the style of text you want, move your mouseso the cursor is over the area of the image where you want your text to appear and left click.  You’ll notice that a new layer suddenly appears in the layer palette on the RHS of the image (see image below).  This is the text layer, by default named layer 1.  You can change this simply by going to the layer drop down menu and selecting rename layer.  This is useful if you are creating multiple layers and prefer to name them intuitively.

Text appears as a new layer Colin Munro Photography

Image 3. Text appears as a new layer

The next step is simply to type your text.  I’ve chosen to add copyright text to my image, something I tend to do before uploading any images.

dding copyright text to an image colin munro photography

Image 4. Adding copyright text to an image

Sometimes text can look very intrusive in an image.  One way of reducing this is to change the opacity of your text.  We do this by going back across to our layers menu and clicking on the arrow at the side of the opacity box, immediately above our layers.  This then displays a slider control whereby we can vary the opacity of the active layer (i.e. the one highlighted in blue) in this case out text layer, from between 1-100%.  As you can see in this example I’ve selected 41% opacity.  As an aside, you’ll also note that Elements has changed the name of the layer to the text I’ve typed.  This can also be helpful in allowing us to remeber which layer is which.

Image 5. Changing the opacity of your text

Image 5. Changing the opacity of your text

xxxxxxx

Image 6. Text with reduced opacity

Image 6. Text with reduced opacity

Okay, so we’ve got our text written, we’ve reduced the opacity to our liking, only now it’s there we suddenly realise it’s in the wrong part of the image.  Not a problem.  We simply select our ‘Move’ tool.  You should then see a bounding box appear around our text, as in image 7, below.

Image 7. Selecting text with the 'Move' tool

Image 7. Selecting text with the ‘Move’ tool

Moving our mouse over the text, hold down the left button and drag the text to the part of the image where you would like it to be.

Image 8. Our text has now been moved.

Image 8. Our text has now been moved.

 Our final steps and to flatten our image, reducing our two layers back to one, and then save our image.  To flatten our image we open up the Layer drop down menu in the top menu bar and select ‘flatten image’ which should be the option right at the very bottom of the drop down menu.  Once we  click on this you should see that our two layers become one, as in image 9 below.  We can then either save our image or rename it through the ‘save as’ option.

Image 9. Our final step is to flatten our image.

Image 9. Our final step is to flatten our image.


Colin Munro

Common dolphins, fastest mammal in the sea

Common dolphin (Delphinus delphis) swimming at high speed. Colin munro Photography

Common dolphin (Delphinus delphis) swimming at high speed, just below the surface.

What is the fastest marine mammal? There are a number of pretty speedy guys in the water. It’s been calculated that when an orca, weighing up to five tonnes, breaches this requires an exit speed of around 40kph. That’s around the same as the maximum speed attained by Usain Bolt in a 100 metres race. Only he doesn’t weigh five tonnes…and he’s not doing it underwater. In 2009 french swimmer Frédérick Bousquet set a World record 50m freestyle sprint, with an avergae speed of 8.6kph. A lot faster than you or I, but never gonna outswim an orca; orcas can, in fact touch 50kph when they want to. Perhaps surprisingly, given that they weigh upwards of 150 tonnes, blue whales are also pretty zippy, also able to get the needle up to 50khp when in a hurry (why would blue whales be in a hurry?). However current data suggests that the fastest dude on the block is the common dolphin (Delphinus delphinus). These guys can reach 64kph (40mph). According to the Guiness Book of records that’s a whisker slower than the fastest racehorse (Winning Brew, 2008) over 400 metres (two furlongs). I’ve owned cars that struggle to do that on hills.

It is hard moving fast through water compared to air, so how do they do it? In 1936 zoologist Sir James Gray looked at this and concluded that dolphins simply shouldn’t be able to generate sufficient power to move them through the water as fast as they appeared able to do. This became known as Gray’s Paradox. It is now believed that the hydrodynamic shape of dolphins greatly reduces form drag, and thus the power required. There is also some evidence that the dolphin’s soft skin, which is continually shed, reduces friction drag. Even so, that a dolphin can travel as fast as a thoroughbred racehorse, through a medium almost 800 times more dense than air, is pretty impressive.

How many common dolphin species?
Until the 1960s all common dolphins were considered one single species. Genetic studies have indicated that there are probably at least two, possibly three distinct species. These are the short-beaked common dolphin (Delphinus delphis) which is the species most likely to be encountered in british waters; the long-beaked common dolphin (Delphnus capensis), and possibly a third species, the arabian common dolphin (Delphinus tropicalis) although many marine biologists consider this a subspecies of the long-beaked common dolphin.

You can contact me directly email me
Colin Munro

Porbeagle populations in the N.E. Atlantic critically endangered.

Porbeagle shark, Lamna nasus, caught as bycatch, on the deck of a fishing vessel, Irish Sea, UK. Colin Munro Photography

Porbeagle shark, Lamna nasus, caught as bycatch, on the deck of a fishing vessel, Irish Sea, UK. Colin Munro Photography

Porbeagle shark, Lamna nasus, caught as bycatch, on the deck of a fishing vessel, Irish Sea, UK.


Porbeagle sharks (Lamna nasus) are a temperate water species of shark belong to the mackerel shark family (Lamnidae), the same family as salmon sharks, makos and great whites. Adults are around 2.5 metres long and and weigh about 140kg. They are considered vulnerable throughout their range. The population around UK shores (NE Atlantic) is considered critically endangered (IUCN). The International Committee for Exploration of the Seas (ICES) advises that the NE Atlantic stocks may be close to collapse. A quota system for porbeagles was introduced in 2008. The Total Allowable Catch (TAC) was reduced to 436 tonnes in 2009. In UK waters a total ban on targetted fishing by commercial fishermen has been in place since 2010, with release of accidental bycatch whenever possible. ICES has called for a zero TAC since 2006; there are now proposals to bring this in to effect throughout the EU.

There is a still a problem in that porbeagles, are fast swimming predators that feed on squid and fish. Freuqently the species that fishermen are also targetting. Porbeagles may end up as accidental bycatch in trawls or in set nets. Like other mackerel sharks, porbeagles’ gills work by obligate ram ventilation. This means they need a constant flow of water past their gills in order to oxygenate their blood. Trapped in nets they quickly drown. As set nets are often deployed on the seabed then hauled 12 or 24 hours later, even if the fishermen would like to release them alive it will be too late. The Centre for Environment, Fisheries and Aquaculture Science (CEFAS) is currently conducting a DEFRA commissioned study in to the threats posed by accidental bycatch to porbeagle in UK waters. Hopefully this will result in guidance for fishermen as to the best ways to minimise the risk of accidentally catching porbeagles.

Save our Seas is working with the Marine Institute in Ireland to satellite tag porbeagles. This should help us understand portbeagle migration and possibly identify nursey areas. This has so far shown that porbeagles tagged off northern coast of Ireland have resurfaced off Lisbon, Portugal. Details of the study can be seen here.

Interesting fact: All fish are cold blooded right? Not quite. Recent studies have found that most mackerel sharks (salmon sharks, great whites, shortfin mako and porbeagles) are able to maintain their body temperature above that of the surrounding water, as marine mammals do. They acheive this by passing deoxygenated blood, heated by muscle activity and biochemical reactions, past a network of cold, oxygenated blood travelling through a network of fine arteries (the rete mirable, literally ‘wonderful net’) thus transferring heat to the arterial blood rather than simly losing it to the external environment. Salmon sharks (Lamna ditropis) sharks have been found to maintain their core temperature up to 21 degrees C above that of the surrounding water (Goldman et al, 2004)

Update
Porbeagles are endangered throughout the Atlantic. The EU has now voted to ban commercial porbeagle fishing. Currently only Canada allows a commercial fishery, although the Canadian Government are coming under considerable pressure from conservationists within and outside Canada. More more information on this read the Friends of Hector article here.

References
Goldman, K.J., Anderson, S.D., Latour, R.J. and Musick, j.A., 2004. Homeothermy in adult salmon sharks, Lamna ditropis. Environmental Biology of Fishes 71 (4): 403–411.

Pic of the Day: Fisherman on a trawler

A fisherman lifts the steel wire warps, that tow the trawl net, in to blocks at the stern of the trawler. Colin Munro Photography

An occasional and erratic series of images.  Today’s is of a fisherman heaving the steel wire warps that tow a trawl net in to blocks suspended from the gantry at the stern of the trawler.  The heavy steel trawl doors that act like hydrofoils, keeping the moth of the net open, can just be seen as the sink beneath the surface.

A fisherman lifts the steel wire warps, that tow the trawl net, in to blocks at the stern of the trawler. Colin Munro Photography

A fisherman lifts the steel wire warps, that tow the trawl net, in to blocks at the stern of the trawler.

The rule of thirds for Photography

Image illustrating rule of thirds. Sunrise over mudflats, Exe Estuary near Cockwood Harbour. Colin Munro Photography

The rule of thirds is one of the first principles we come across if we start delving in to photographic image composition. The rule was originally developed for paintings, but of course it applies equally to photographs. As a principle it has endured pretty well, it’s first description being attributed to an 18th painter called Sir Joshua Reynolds, the first president of the Royal Academy of Arts in London.

Vincent Van Gogh The Starry Night. Google Arts Project.
Vincent Van Gogh’s ‘The Starry Night’ is one of the most famous works of art where the ‘rule of thirds’ is evident (image in public domain, via Wikipedia).

What is the Rule of Thirds?

So what is the rule of thirds?
Perhaps counter-intuitively, you do not divide the image in to thirds. Rather you divide the image in to nine sections with two vertical and two horizontal lines.

rRule of Thirds diagram Colin Munro Photography
Rule of Thirds

The idea is that objects of interest in the image should be placed either at intersects of lines or along the lines dividing the image. This, according to the rule, creates a more pleasing balance to the image than simply placing the object of interest in the centre of the image.

Sunrise over mudflats, Exe Estuary near Cockwood Harbour. © Colin Munro Photography. www.colinmunrophotography.com
Sunrise over mudflats, Exe Estuary near Cockwood Harbour.
Image illustrating rule of thirds. Sunrise over mudflats, Exe Estuary near Cockwood Harbour. Colin Munro Photography
Image with lines showing horizon lying roughly along upper line, sun near top right intersect.

In the above image, placing the horizon roughly along the upper horizontal line, and the sun roughly in line with the intersect of the upper horizontal and the right hand vertical, follows the rule. For me at least, it works here, creating a far more appealing image than if the horizon lay along the mid-line of the image, or the sun placed centrally.

Rules are meant to be broken 

As with all rules, rules are meant to be broken. Sometimes by breaking a convention one can make the image more arresting. When to do that is ultimately a personal decision, but it always helps to understand the rule you are breaking.

Heavy rain clouds above Teignmouth Pier, Teignmouth, Devon. © Colin Munro Photography
Heavy rain clouds above Teignmouth Pier, Teignmouth, Devon, England, UK.

For ready-to-hang wall-art canvas wrap prints, fine art wildlife prints, acrylic prints, stock images and more photography, natural history, diving and travel stories, visit my main site: www.colinmunrophotography.com

ColinMunroPhotography.com Colin Munro Photography fine art prints direct from the photographer
colinmunrophotography.com

I write these posts primarily because I enjoy doing so. They’re free to read, and if you enjoyed reading this one I hope you’ll continue to read them. I have no plans to paywall any of them. If you feel like you want to support my time input, well … I do like good coffee.

My latest blog posts

  • A visit from Islamic Revolutionary Guard Corps
    Rather different from my usual blogs. At the time of writing this it seems likely that the US is about to launch an attack on Iran. Hopefully that assumption is wrong as the potential to spill over into a major war is considerable. However current events have made me think about my only time in… Read more: A visit from Islamic Revolutionary Guard Corps
  • (no title)
    The Stump-tailed Macaque, Macaca arctoides, largest of Thailand’s macaques. The Stump-tailed Macaque (Macaca arctoides) is the largest and heaviest of the six species of macaque found in Thailand. It is not one of the more commonly encountered species. The range of stump-tailed macaques has shrunk significantly in recent decades; once widespread across Thailand it is… Read more: (no title)
  • Christmas gifts. Made to order wildlife and landscape canvas prints to buy
    Made to order fine art canvas prints, ready-to-hang, direct from the photographer It is almost that time again, where we rack our brains to find novel gifts for our loved ones. So here’s a thought. How about a wall art, canvas, fine art paper, or acrylic print. One you cannot buy from any of the… Read more: Christmas gifts. Made to order wildlife and landscape canvas prints to buy
  • Thailand’s Chao Lay People.
    Changing lives for the remaining sea nomads of the Andaman coast In Southeast Asia, as in so much of the World, traditional ways of life are disappearing fast. Ethnic groups and cultures are being absorbed into the modern world before our very eyes. In the past few decades nomadic groups that roamed across national borders… Read more: Thailand’s Chao Lay People.
  • Now on Substack
    Photography, Natural History, Travel and Environment stories now on Substack This is just a brief post to let people know I’ve fairly recently started a Substack account and began posting stories on there. This will cover topics including photography, wildlife, environment, diving, travel, in other words broadly the same topics I’ve been posting about in… Read more: Now on Substack

Royal Albert Memorial Museum and Art Gallery Exeter

Birds of a feather exhibition, Royal Albert Memorial Museum (RAMM) Exeter. Colin Munro Photography. www.colinmunrophotography.com

I took a few images in Exeter’s museum yesterday. I’ll add a few more over the next couple of dayes. here’s the first.

Birds of a feather exhibition, Royal Albert Memorial Museum (RAMM) Exeter. Colin Munro Photography. www.colinmunrophotography.com

Birds of a feather exhibition, RAMM, Exeter

Samuri, Royal Albert Memorial Museum (RAMM) Exeter, Devon. Colin Munro Photography. www.colinmunrophotography.com

Samuri, Royal Albert Memorial Museum (RAMM) Exeter, Devon


Large mammals exhibition, Royal Albert Memorial Museum, Exeter, Devon. Colin Munro Photography. www.colinmunrophotography.com

Large mammals exhibition, Royal Albert Memorial Museum, Exeter, Devon.

Photography courses and workshops
Exe Estuary fine art prints
Dartmoor fine art prints

Lyme Bay Reefs.

Sunset corals,Leptopsammia pruvoti, growing on the Saw-tooth Ledges Reef, Lyme Bay, Southwest England. Colin Munro Photography. www.colinmunrophotography.com

This blog post about the marine life and importance of Lyme Bay Reefs has moved to my marine biology website: Marine-bio-images.com. You can read it here at:

https://www.marine-bio-images.com/blog/lyme-bay-marine-ecology/lyme-bay-reefs/

Dartmoor images Fine Art prints of Dartmoor

Skull and jawbone on a windswept moorland. Dartmoor, Devon. Colin Munro Photography


As Christmas draws near, why not give a photographic art of local landscapesas a gift? My Dartmoor images are available as art prints and cards. These can be purchased dierct from me (see below). As a long term Devon resident, and keen supporter of Devon Wildlife Trust and its work, 10% of all purchases made before Christmas will be donated to the Devon Wildlife Trust. All images on my website are watermarked.  This will NOT appear on the print.

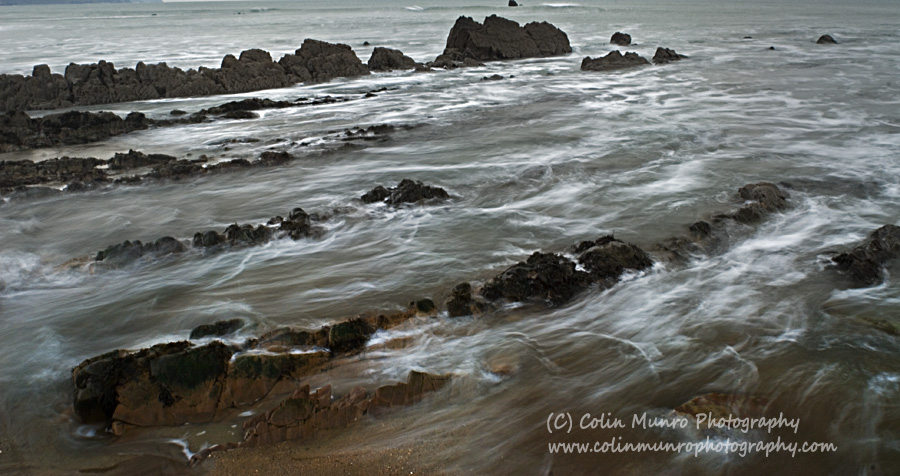
I’ve been taking a few Dartmoor images recently. The moor always looks more interesting as the weather turns colder and the days shorter. This has resulted in a few nights camping out. Sometimes chasing the elusive sunrise that remains hidden behind a thick blanket of grey cloud; sometimes up to mid-thigh in freezing fast-flowing rivers. So I’ve decided to pull a few together, some old, some new. I try and steer clear of well worn styles and try to capture the feel and atmosphere of the moor, the bleak, harsh beauty and the wide open spaces. As ever, all my images are available to purchase as fine art prints, each printed to order to specific requirements. If you’d like to know more then email me here.

Lichen covered granite boulders of a dry stone wall. Dartmoor Devon. Colin Munro Photography. Fine Art prints

Image 1346. Lichen covered granite boulders of a dry stone wall. Dartmoor Devon.

The glow from a lantern inside a dome tent on a starry, moonlit night on Dartmoor.  Colin Munro Photography.

Image 1002. The glow from a lantern inside a dome tent on a starry, moonlit night on Dartmoor

Icicles and ice formations around a fast flowing stream on the steep-sided Teign Valley, Dartmoor, Devon.  Available as a fine art print. Colin Munro Photography. www.colinmunrophotography.com

Image 1054. Icicles and ice formations around a fast flowing stream on the steep-sided Teign Valley, Dartmoor, Devon.

Boulders and small waterfalls on the East Dart River, high on Dartmoor above Two Bridges. Dartmoor National Park. Fine Art prints for sale. Colin Munro Photography. www.colinmunrophotography.com

Image 1019. Boulders and small waterfalls on the East Dart River, high on Dartmoor above Two Bridges. Dartmoor National Park

Icicles form along the lip of a rocky overhang on the steep sides of the River Teign Valley, East Dartmoor, Dartmoor National Park,  Devon, England.  Fine art prints available. Colin Munro Photography. www.colinmunrophotography.com

Image 1057. Icicles form along the lip of a rocky overhang on the steep sides of the River Teign Valley, East Dartmoor, Dartmoor National Park.

The East Dart River tumbles through a boulder strewn valley, East Dartmoor.  An HDR image.  This image is available as a fine art print to purchase. Colin Munro Photography. www.colinmunrophotography.com

Image 1348. The East Dart River tumbles through a boulder strewn valley, East Dartmoor.

Icicles over a moorland stream, Dartmoor National Park, Devon, England. colin Munro photography

Image 791. Icicles over a moorland stream, Dartmoor National Park, Devon.

Icicles above a small waterfall on the South Teign River, Dartmoor, Devon, England. Colin Munro Photography. www.colinmunrophotography.com

Image 41. Icicles above a small waterfall on the South Teign River, Dartmoor.

Wind dried bones picked clean by ravens and foxes.  Dartmoor National Park. Colin Munro Photography. www.colinmunrophotography.com

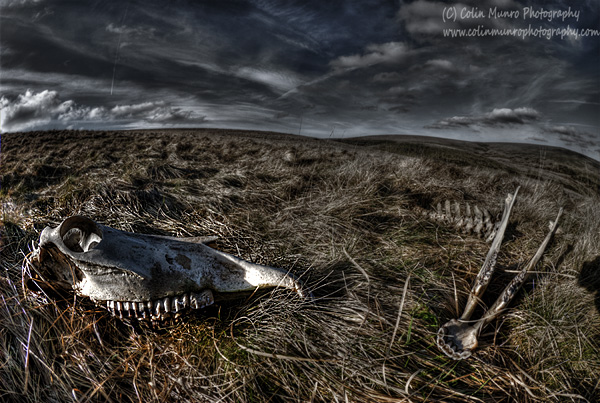
Image 1349. Wind dried bones picked clean by ravens and foxes. Dartmoor National Park.

The boulder-strewn steep sided valley of the East Dart River above Two Bridges, Dartmoor National Park, Devon. Colin Munro Photography

Image 1020. The boulder-strewn steep sided valley of the East Dart River above Two Bridges, Dartmoor National Park, Devon

Boulders and small waterfalls on the East Dart River, high on Dartmoor above Two Bridges.  Dartmoor National Park Colin Munro Photography

Image 1021. Boulders and small waterfalls on the East Dart River, high on Dartmoor above Two Bridges. Dartmoor National Park.Fine Art Prints.

FINE ART PRINTS All of the above images can be puchased as Fine Art, archive quality prints on high grade paper or canvas.

Prints up to 10×15 inches (25x38cm) size are produced on Fuji Crystal Archive DP Professional Paper using the latest Fuji Frontier Digital Wet Photographic processing. This system produces rich, vibrant colours and has an archival life of up to 35 years, making ideal for producing long lasting prints. They are available in Pearl or Gloss finish.

8×12 inches (20x30cm) prints are available for only £22 per print.
10×15 inches (25x38cm) prints are available for only £32 per print.

If you are interested in purchasing one or more prints please call or email me stating the finish (pearl or gloss) and the size required. Currently I am happy to accept PayPal, bank transfer, cheque or cash on collection. Cheques will need to clear before delivery.
Please add £2.50 for postage and packaging to mainland UK, worldwide postage on request.

Larger prints, up to 62 inches (1075cm) across are available.
These can be printed on photo gloss or pearl paper, fine art rag paper or on canvas.
Block mounts and backlit
Again the prints can be supplied in block mounts or as a print for backlighting. Please contact me for details and prices.

HOW TO BUY. If you are interested in any of the above options please email or call me, 07926 478 199, stating the Image Number (given in caption), image size, finish (pearl or gloss) and number of images and how you would like to pay.  I will then reply confirming the amount.

Paypal: To pay for prints by simply log in to paypal and make the payment to colin (at) colinmunrophotography.com.
Bank transfer: To pay by bank transfer simply let me know in your email and I will include the account details in my response.
Cheque: To pay by cheque, let me know and I will include the postal address in my reply. Please note that you will need to allow extra time for cheques to clear on delivery times.
Confirmation:Once I receive payment I will email you confirming this. Prints should then be despatched within five working days.

More prints

You can search my blog for prints for sale by typing ‘Prints for sale’ in the seach box at the top, or simply by clicking this link.

Email me or telephone +44 (0)7926478199 for prices and delivery details.

More... See more of my Devon images fine art prints here

The wreck of an old wooden boat trapped in ice covered mudflats is silhouetted against an ominous sky. Exe Estuary near Turf Locks, Devon, UK. Fine Art Prints for sale. Colin Munro Photography. www.colinmunrophotography.com

Old wooden boat trapped in ice covered mudflats

More of my Dartmoor images are available on Photoshelter, where prints can be bought or images licensed click here
A selection of my images are available on Redbubble (Australia) as prints, posters and cards here

Sunrise over Cockwood Harbour at low tide, Exe Estuary, Devon.

Dawn over Cockwood Harbour on a frosty December morning.

Courses, Classes and Workshops. If you like my Dartmoor images you may be interested in my one day landscape photography courses for individuals and small groups autumn/winter 2012. These will be based around the Exe and Teign Estuaries and East Dartmoor. More info here.

Enfield Bullet 500cc at sunset. Prints for sale, Colin Munro Photography.

Enfield Bullet 500cc at sunset.

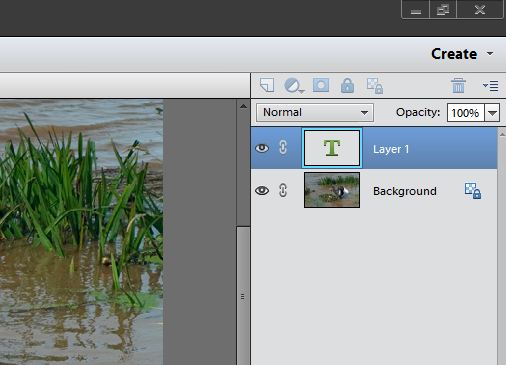
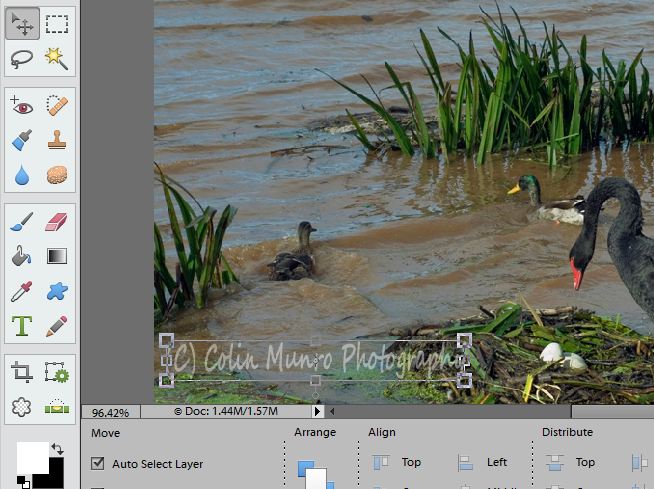
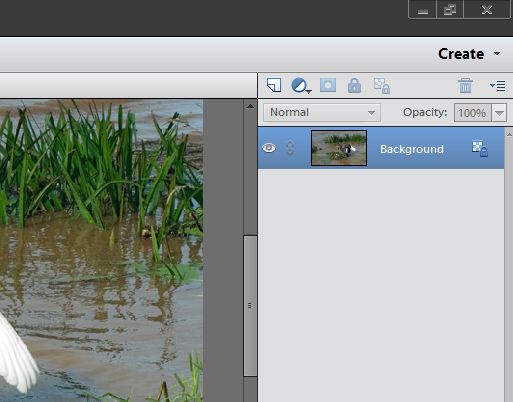
Photoshop is an essential part of my toolkit for successful landscape photographs, in the same way we used to dodge and burn prints when working with film.  If you would like to learn more about the potential of Photoshop to enhance your images why not sign up for one of my one to one (or small group) Photoshop sessions.  These are economical and targetted at exactly what you want to learn.  More info here.

Filming over-under shots at sea: the pros and cons of high-end video versus DSLR

An over-under shot of a diver waiting to be picked up at the end of a dive. Colin Munro Photography
An over-under shot of a diver waiting to be picked up at the end of a dive.

I recently completed a short shoot requiring over-under shots at sea; shots of a boat passing by and of a girl who had ‘fallen’ in to the sea. This was UK waters in late September, so conditions were – shall we say – not mirror smooth and crystal clear. If fact we ended up shooting about an hour and a half before sunset with the water darkening and a noticeable sou’westerly breeze creating a bit of a swell; so on the positive side the look was realistic. The shots had been planned for a Sony Alexa, but housing availability and cost considerations pushed the shoot to a DSLR; a Canon 5D MkII to be precise. At first consideration shooting video on a DSLR may seem a big step down from the 2K Alexa, but that’s not necessarily so. The shoot brought a number of these points to mind, so I thought I’d write a short blog on the pros and cons of dedicated high-end video cameras versus DSLRs for shooting over-under or surface shots in open sea. I’m not going to consider or compare camera image quality here; there are plenty of websites reviewing and out there doing just that. Instead I’m going to look purely at usability in this rather problematic situation. Producing good images is not simply a question of image resolution; factors such camera steadiness, ability to focus and frame accurately and freedom from water splash droplets need to be taken in to account also. I’ve randomly selected some well known manufacturers to as examples. This is not to imply the are particularly better or worse than others, simply that they are brands many will be familiar with and the data for them is readily available (and sometimes because I have used them and so have experience and images). Equally, any implied criticism is merely to point out that in this very specific type of shot certain types of equipment have inherent problems. In general, for underwater shoots (which is what they are designed for) they perform excellently.

Weight

A key consideration is the overall weight of the rig. Now of course well designed housing-camera combinations are near neutral buoyancy below the surface as the air spaces inside the housing providing positive buoyancy and so compensating for the weight of the metal, glass and perspex of the housing and the camera itself. Close to the surface a large housing with plenty of mass is also a distinct advantage. Swell and surface chop will buffet both cameraman and camera, tending to make the image jump about. A large system with plenty of mass will resist such buffeting and moves more slowly than a little lightweight system, in much the same way as a small rowing boat is tossed about by wave action that has no effect at all on a naval destroyer.

Colin Munro setting up a Sony EX1 in a Gates Underwater housing on the surface prior to a dive. (C) Holly Latham.ll size video housing above the surface
Holding a full size video system partially out of the water requires the strength of Arnie Swarzenegger, even with a trailing line to hang on to. Picture by Holly Latham.

On the surface however, other factors come in to play. That positive buoyancy that balances the weight of the system disappears, and the downward force of the weight of the proportion of the camera and housing above the surface is counteracted only by the upward force applied on the grip handles by the cameraman’s arms. That is damn hard work! As an example, a Gates housing for the Red Epic or Scarlet, in air, weighs in at about 43lbs (19.5kg) including camera. That’s roughly the weigh of a six year old child. It is true that not all of that weight will be felt as not all of the housing will be above the surface; but even if it is only 20lbs for those half and half shots you are going to need pretty impressive biceps and shoulder muscles to hold it up and hold it steady whilst getting that 3rd take of that key shot. You are also going to be finning like hell to counteract the toppling forward effect of the unbalanced weight of the housing held in front of you. Comparing this with a suitable DSLR for video, a 5D MkII in an Aquatica housing (again, given as a representative example) weighs in at around 9lbs (4kg). This is still not much fun in a choppy sea but you don’t have to be built like Arnie to be capable of doing it.

Leverage

Essentially the weight distribution combined with the overall length of the rig. Again, a DSLR wins hands down in the category. A Gates housing for the Sony EX1 is around 17 inches (44cm) long; an Amphibico housing for the Sony EX3 squeezes in at a tad over 20 inches (52cm). For over-under shots one will almost certainly need to be working with a wide angle lens and a big dome port (if you don’t understand why, read the last paragraph). This can mean having something like the exceedingly beautiful and optically wonderful, but extraordinarily heavy Fathom superwide port fitted to the far end of your housing. This will produce stunning images but cause vein-popping strain on your upper body as you attempt to lever this half out of the water. Big glass ports on DSLRs are also heavy (e.g. the fantastic Zen DP-230 9 inch superdome, weighs in at 3.9lbs, 1.8kg) but due to the much shorter length of DSLR housings they are mounted only a couple of inches in front of the grip handles. There is still a forward tilting effect, but it is much less pronounced.

Colin Munro leak testing a Hugyfot housing for a Canon 5D MkII DSLR, during setup prior to filming.
As can be seen in this pic of leak testing a Hugyfot, the dome port is only fractionally in front of the grips handles.

A final consideration is focussing and viewing. Most housings for professional video systems do allow viewing of the camera’s viewfinder, but this is generally small and tricky to use through a housing even in easy conditions. So instead most come equipped with a larger external monitor that can be mounted on top of the housing. This is perfect for underwater, but at the air-water interface simply adds additional weight above the water’s surface, pushing the camera further down. External monitors are also available for DSLR housings, and again they are extremely useful beneath the surface but not at the surface. DSLRs do have the advantage of having a large LCD screen that is much easier to view at the surface of a choppy sea; many housings will also take a 45 degree enlarged viewfinder that can make focussing and framing through the viewfinder a much more practical proposition when floating on the surface.

Why do we need to use wide-angle lenses and large dome ports?

This is a brief summary of quite a complicated subject. We need to use large dome ports when taking over-under shots for two reasons. The main reason is because light travels at a different speed through air than water. If flat ports are used with wide angle lenses then considerable bending occurs to light rays passing through the port other than those passing through perdicular, significantly distorting all except the central part of the image. However, this change in wave velocity of light passing through the dome (effectively a curved water-air interface) causes the dome to act as a powerful diverging lens below the water surface making objects at infinity appear to be at a distance of slightly less than 4 x dome radius. This is known as the virtual image. Thus using a small dome port, with a small radius, will bring the virtual image very close to the lens entrance pupil. For example, a 4 inch dome port will result in a virtual image approximately 5.5 inches in front of the port. Above the surface, with air on either side of the dome, this effect does not happen and the lens must focus on the actual image to produce sharp images. Consequently a lens with a large depth of field (DoF), i.e. a wide-angle lens, is required. However 5.5 inches to infinity is too great a DoF for almost any lens, thus a larger dome is required, moving the virtual image further away from the front of the dome and so decreasing the required DoF for both underwater and above surface images to be in focus simultaneously. An 8 inch diameter dome is generally considered the minimum necessary to allow simultaneous focussing above and below the surface (a more detailed technical explanation, with calculations and downloadable formulae has been produced by Dave Knight of Cameras Underwater. This can be read here. The example figures I give here also came from Dave’s page). The second consideration is that, if working in a pool with a mirror calm surface, then we can precisely line up the water surface with the middle of the lens even on a tiny dome or flat port. It’s not like that in the sea though; if you are lucky you’ll be working with just a few ripples or maybe a lazy swell passing through, if not you may have 18inch waves slopping through (if you have more than this, give up and go home). A bigger dome gives you more surface area to play with when lining up the camera. It also means that small waves or splashes are less likely to cover the upper half of the dome, leaving droplets visible on the surface. Whilst on the point of droplets and splashes, the biggest curse of trying to shoot half in-half out, although heavier and more expensive, glass domes do have the advantage of shedding water more easily that their acrylic counterparts.

For more stories, made to order framed wall-art canvas wrap prints, fine art prints, posters, stock images and more stories, visit my main site: www.colinmunrophotography.com

ColinMunroPhotography.com Colin Munro Photography fine art prints direct from the photographer
colinmunrophotography.com